
Export Data With Data Cloud Ship
NinjaCat’s Data Cloud Ship provides two methods for accessing data collected through NinjaCat's Data Cloud:
BI Connect directly shares the database with the user, fully replicated and synchronized. Whether it's via a reader account or your own, pre-existing Snowflake account you get full access to the database. It is always up-to-date with read-only access. Data Export allows exporting data on an interval that you control. NinjaCat sends data to you. NinjaCat is not replicating or managing the replication like in BI Connect. You are responsible for managing and monitoring your data.
Data Cloud Ship does not support local downloads.Data Cloud Ship is designed to export your datasets directly to cloud storage destinations — such as Amazon S3, Google Cloud Storage, Google BigQuery, Azure Blob Storage, or a Snowflake reader account via BI Connect. There is no option to download data as a file directly to your computer.
If you need data in a local file, consider running a report export from elsewhere in NinjaCat, or pulling the data from your connected cloud storage destination after the export completes.
Accessing Data Cloud Ship
- After logging in to NinjaCat and creating at least one dataset, click on the "Ship" option under "Data Cloud" in the main navigation

BI Connect
Using BI Connect creates a new Snowflake reader account and stores all data streams for external use by a NinjaCat client.
- After Accessing Data Cloud Ship click on BI Connect in the top left under "Ship Data"
- Click the Setup BI Connect button near the center

NinjaNote: After the button is clicked the BI Connect page displays a waiting state. Behind the scenes is the provisioning of a volume to store the new database, the creation of a new database, and the creation of a database access account. A wait time will be displayed on the page.
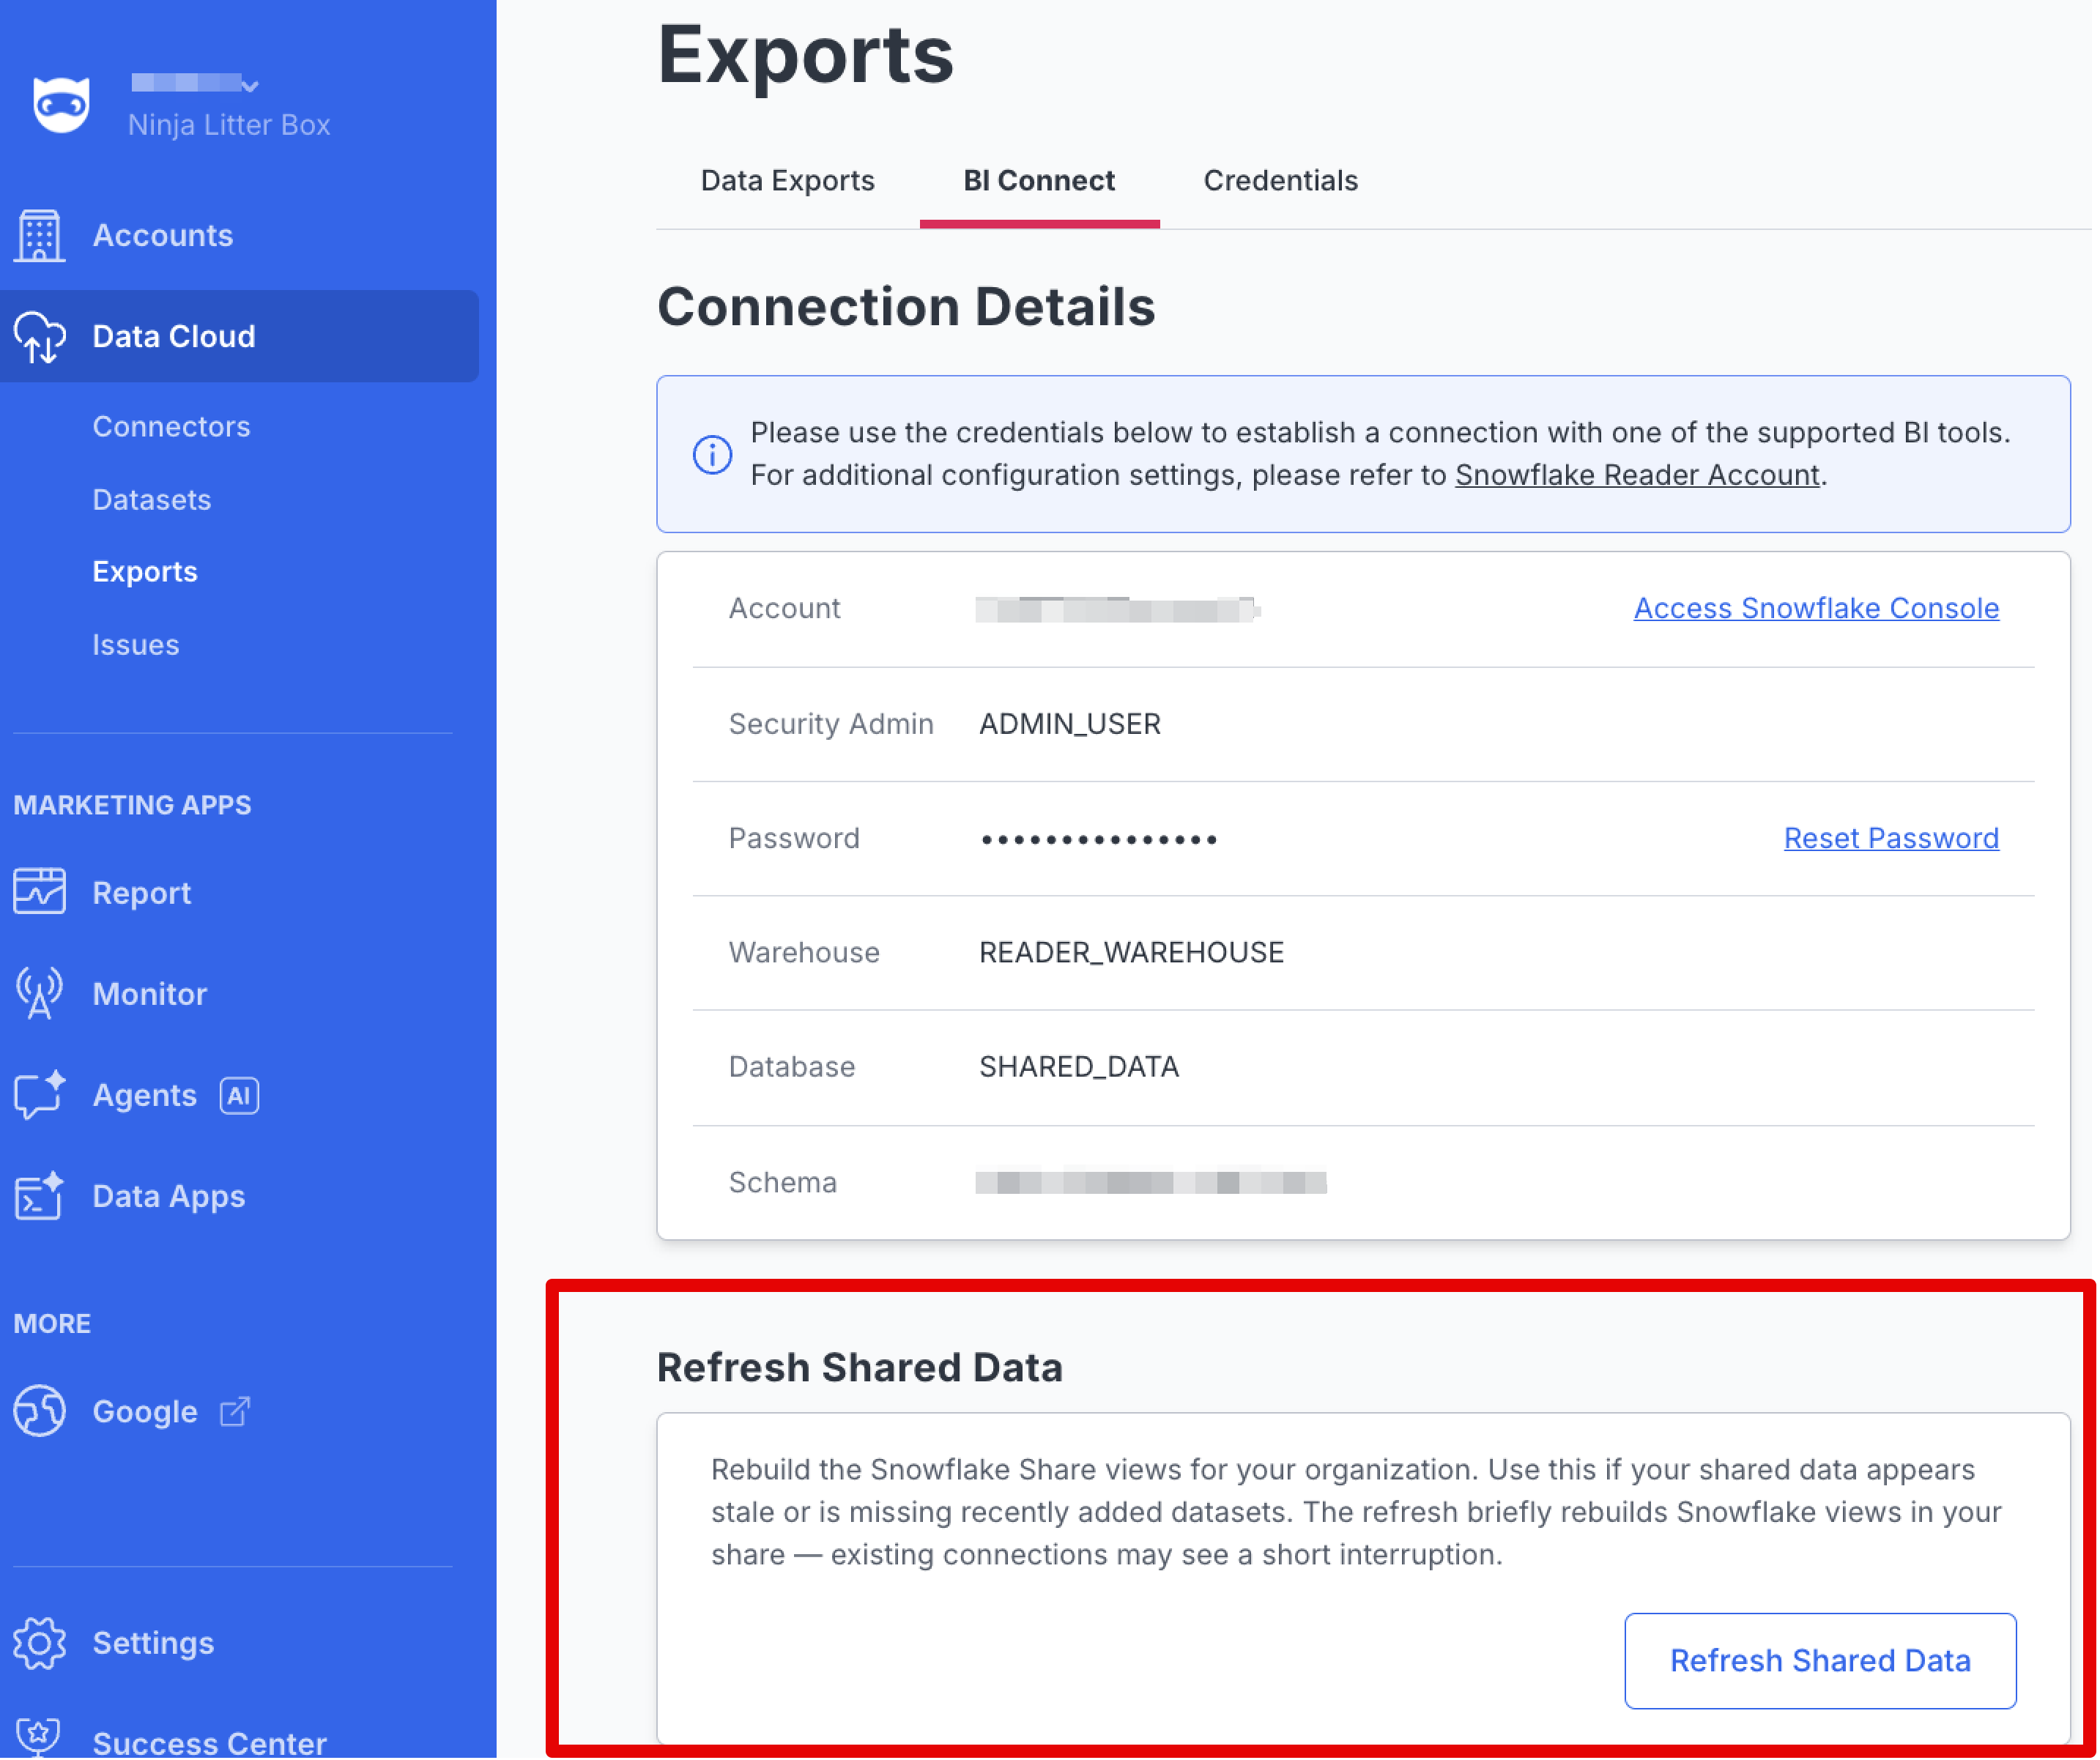
- Once setup is complete the basic Connection Details will display on the page
- Click the link labeled "Set Password" near the center to create a password for the new Snowflake user account
- Enter the new desired password into the fields, once entered you will be granted access to the Snowflake web interface

- After gaining access to the Snowflake Reader Account, the Connection Details on the NinjaCat BI Connect page will be more detailed. The full Connection Details are:
- Account - Account Name/ID
- Security Admin - User Name
- Warehouse - Snowflake data storage area name
- Database - Snowflake database name
- Schema - Snowflake database schema name
Also on the Connection Details page is a link to access the Snowflake web interface and a link to reset the Security Admin user password.

NinjaNote: The type of user that gets created by default is a Security Admin. This type of user possesses the permissions necessary for account management. It is not recommended to use the Security Admin user to access data. The best practice would be to create specific users for different purposes. Information on Snowflake user roles is linkedhere
Refreshing Shared Data
If the data in your Snowflake reader account looks stale, recently added datasets are missing, or view names appear out of date, you can rebuild your organization's Snowflake views on demand from the BI Connect screen.
- From the BI Connect screen, locate the Refresh Shared Data card.
- Click Refresh Shared Data.
- Review the confirmation prompt and click Confirm to proceed.
NinjaCat will rebuild the Snowflake views for your organization. Once complete, your reader account will reflect the current set of datasets and the latest view definitions from NinjaCat.
What gets refreshedOnly the Snowflake view definitions in your reader account are rebuilt. Your underlying source data is never modified.
Brief interruption to active connectionsWhile the views are being recreated, active BI tool connections (for example, Looker Studio, Tableau, or Power BI dashboards querying the share) may see a brief interruption. We recommend running a refresh during a quiet period for your team.
When to use Refresh Shared Data
- Datasets you recently added in NinjaCat aren't appearing in your BI tool.
- View names in Snowflake look out of date or don't match dataset names you see in NinjaCat.
- Data in connected dashboards looks stale or inconsistent with what you see in NinjaCat.
Dataset renames now update Snowflake view names
When you rename a dataset in NinjaCat, the corresponding view in your Snowflake reader account is now updated to match. Previously, renamed datasets kept their original view names in Snowflake, which could cause confusion in connected BI tools. No action is required — newly renamed datasets will reflect the updated view name automatically. If you have datasets that were renamed before this change, run Refresh Shared Data once to bring existing view names in line with their current dataset names.
Creating Credentials
AWS
Data Cloud Ship can be configured to send CSV files of your datasets to an Amazon S3 bucket. Before you can set up the export in NinjaCat the following steps must be taken:
Create the AWS Bucket - The S3 bucket must be created in AWS before configuration. Any managed folders may be pre-created if desired, but it is not required.
Create an IAM User - Go to the IAM section of the AWS Console and create a new user that does not have console login permissions, but has a role/policy attached. Specify Permissions by attaching one of the following:
- An attached role of the AWS Managed Policy:
AmazonS3FullAccess(not recommended) or
An attached policy containing minimally
{ "Version": "2012-10-17", "Statement": \[ { "Sid": "VisualEditor0", "Effect": "Allow", "Action": \[ "s3:PutObject", "s3:GetObject", "s3:ListBucket" \], "Resource": \[ "arn:aws:s3:::target-bucket-name", "arn:aws:s3:::target-bucket-name/\*" \] } \] }

- Review and create the policy

Create an Access Key
- Once the user has been created, and the policy attached, go back to the main user screen and select the user
- Then go to the "Security Credentials" tab and create a new access key

- Select the "other" use case, and then set a name for the access key

Access Credentials
Once created, you can view the AccessKey and SecretKey to add to your NinjaCat DataCloud Ship Credential record.

Google Cloud Storage
Data Cloud Ship can be configured to send CSV files of your datasets to a Google Cloud Storage bucket. Before you can set up the export in NinjaCat the following steps must be taken:
Create the GCS Bucket - The cloud storage bucket must be created in GCP before configuration. Any managed folders may be pre-created if desired, but it is not required.
Create the Service Account - Go to the IAM section of the Google Cloud Console and create a new Service Account with (minimally) the following role against the bucket:
storage.objectCreatoror *storage.admin
Then a new Access Key in JSON format must be created for the service account and downloaded.
Once created, you can copy the Access Key to add to your NinjaCat DataCloud Ship Credential record.
Google Big Query
Data Cloud Ship can be configured to transfer your designated datasets to tables in Google Big query. The CSV exports are staged in a Google Cloud Storage bucket and then merged into tables in Big Query. Before you can set up the export in NinjaCat the following steps must be taken:
Create the Google Cloud Storage Bucket - The cloud storage bucket must be created in the Google Cloud Platform before configuration. Any managed folders may be pre-created if desired, but it is not required.
Create the Service Account
Go to the IAM -> Service Accounts section of the Google Cloud Console and create a new Service Account with (minimally) the following role against the bucket:
* Big Query Data Editor
* Big Query Job User
* Storage Admin (`storage.admin`) - or, minimally, Storage Object User
NinjaNote: To be completely clear: the minimum role assigned to the user being created to access this bucket must be "Storage Object User"

Then a new Access Key in JSON format must be created for the service account and downloaded.


Azure SAS Tokens
To export to Azure Blob Storage, we require a Storage Account level credential with read access to the Container and Writeable access for Blobs.
To export to Azure Blob storage, you must first make sure you have created your Storage Account and a Container in the Azure Portal or CLI, and generate a SAS Token for the storage account (we require permissions for both containers and objects, so the SAS token must be created at the storage account level):

You will need to make sure that the Expiration Time is sufficiently long to support your usage, as creating a new SAS Token will require you to update the credential in NinjaCat.
Copy the generated "SAS token" value and create a new credential in the Export -> Credentials screen. For Example:

Add To Data Cloud Ship Credential Record
- Access Data Cloud Ship
- Click on "Credentials" under "Ship Data"
- Click on the button labeled "Add Credential" near the top right
- Select the desired storage destination (AWS or Google Cloud Platform)
- Click the button labeled "Select and Continue"
- Complete the appropriate fields to give the credential record a recognizable label
- Complete the appropriate fields to input the credential information into the record (Access Key ID and Secret Key for AWS & Service Account JSON for Google Cloud Platform)
- Click the button labeled "Save" near the bottom right

Create Data Cloud Ship Export
New: "Day Before Yesterday" date range presetThe Date Range filter dropdown used when configuring a Data Cloud export now includes a "Day Before Yesterday" option, positioned just after "Yesterday." Selecting it scopes the export to the full calendar day two days prior to the current date — no need to configure a custom date range to pull that period.
This preset is available everywhere the export Date Range dropdown appears (AWS S3, Google Cloud Storage, Google BigQuery, and Azure Blob Storage exports).
AWS S3
Data Cloud Ship can be configured to send CSV files of your datasets to an Amazon S3 bucket.
After creating AWS credentials, adding the credentials to the credential record, and accessing Data Cloud Ship
- Click on the button labeled "New Data Export" in the top right
- Click on "Amazon S3" then the "Select and Continue" button in the bottom right
- Fill in the fields on the "Data" tab to customize the details of the data export
- Choose Data
- Dataset - Select the desired dataset from the drop-down menu
- Columns - Select to export all columns or select only the desired columns
- Surrogate Key - Check the box to add a "hash_key" column to the export with a calculated surrogate key. When enabled, if any duplicate keys are found, the export will fail. Changes to the export will require a full refresh.
- Filter Data
- Accounts - Select to export the data for all advertisers/accounts or select a single or combination of desired advertiser(s)/account(s)
- Date Range - Select to not restrict the amount of data based on date or select to restrict the amount of data in the export based on a date range and a reference point to frame the date range using these two fields:
- Export - Select a time window consisting of a matter of days, weeks, months, or "Since Last Export"
- of data based on - Day, Metric Date, Executed At, Created At, Updated At, Expired At - NinjaNote: For a conventional, incremental export we suggest the "Export" field be set to "Since Last Export" and the "of data based on" field being set to "Executed at". This constitutes a sync statement of "Export the amount collected SINCE LAST EXPORT of data based on the date the last export was EXECUTED AT.
Filtering by a specific account? To filter exports by an individual account, the System Account ID column must be present on the View used as your export source. Once added to the View, System Account ID is available as both an export column and a filter field. See Control Metric Aggregation With Views for the steps to add columns to a View.
If you suspect duplicate rows for an account in your export output, isolate that account and review the raw data in the parent table to investigate account matching at the source.
- Fill in the fields on the "Destination" tab to designate the desired Amazon S3 bucket to receive the export
- Choose Credentials
- Credentials - Select the credentials for the desired export destination from the drop-down menu
- Configure Destination
- AWS Region
- S3 Bucket Name
- S3 Bucket Path (optional)
- Filename Prefix (optional)
- Enable gzip compression
- Export Schedule
- Recurrence cron
- Timezone
- Click the "Save" button in the bottom right

Google Cloud Storage
Data Cloud Ship can be configured to send CSV files of your datasets to a Google Cloud Storage bucket.
After creating Google Cloud Storage credentials, adding the credentials to the credential record, and accessing Data Cloud Ship
- Click on the button labeled "New Data Export" in the top right
- Click on "Google Cloud Storage" then the "Select and Continue" button in the bottom right
- Fill in the fields on the "Data" tab to customize the details of the data export
- Choose Data
- Dataset - Select the desired dataset from the drop-down menu
- Columns - Select to export all columns or select only the desired columns
- Surrogate Key - Check the box to add a "hash_key" column to the export with a calculated surrogate key. When enabled, if any duplicate keys are found, the export will fail. Changes to the export will require a full refresh.
- Filter Data
- Accounts - Select to export the data for all advertisers/accounts or select a single or combination of desired advertiser(s)/account(s)
- Date Range - Select to not restrict the amount of data based on date or select to restrict the amount of data in the export based on a date range and a reference point to frame the date range using these two fields:
- Export - Select a time window consisting of a matter of days, weeks, months, or "Since Last Export"
- of data based on - Day, Metric Date, Executed At, Created At, Updated At, Expired At - NinjaNote: For a conventional, incremental export we suggest the "Export" field be set to "Since Last Export" and the "of data based on" field being set to "Executed at". This constitutes a sync statement of "Export the amount collected SINCE LAST EXPORT of data based on the date the last export was EXECUTED AT.
- Fill in the fields on the "Destination" tab to designate the desired GCS bucket to receive the export
- Choose Credentials
- Credentials - Select the credentials for the desired export destination from the drop-down menu
- Configure Destination
- GCP Bucket Name
- GCP Bucket Path (optional)
- Filename Prefix (optional)
- Enable gzip compression
- Export Schedule
- Recurrence cron
- Timezone
- Click the "Save" button in the bottom right

Google Big Query
Data Cloud Ship can be configured to transfer your designated datasets to tables in Google Big query. The .CSV exports are staged in a Google Cloud Storage bucket and then merged into tables in Big Query.
NinjaNote: Two things to know about the export to Big Query:
- Due to the merging of data the generation of a Surrogate Key is required. A Surrogate Key is a Hash, a mathematical calculation based on specific columns from the data that prevents duplicate data from being merged. Any changes to the export - either of the Surrogate key, or the columns exported (or their headers) will result in the export FAILING on the next run. Changes will require you to rename the old table (or delete it) and run a full export of all rows to recreate and resync the table.
- In the Big Query destination a temp_xxx table is created to stage the loaded data. Those tables are set to expire in 2 hours, but you may see them.
After creating Google BigQuery credentials, adding the credentials to the credential record, and accessing Data Cloud Ship
- Click on the button labeled "New Data Export" in the top right
- Click on "Google BigQuery" then the "Select and Continue" button in the bottom right
- Fill in the fields on the "Data" tab to customize the details of the data export - NinjaNote: BigQuery differs from Amazon S3 and Google Cloud Storage because when a new BigQuery export is created the Columns setting will default to "Selected Columns" instead of "All Columns". The Date Range Setting will default to "Since Last Export" and "Executed at". The Sync mode will default to "Upsert Mode". If "All Columns" is selected If the source data changes, the mismatch in data will cause the merging of data into BigQuery to fail. If you select your columns you will be more aware of changes to the organization of your dataset. When changes to your data structure happen you will be able to prepare for a fresh export to BigQuery.
- Choose Data
- Dataset - Select the desired dataset from the drop-down menu
- Columns - Select to export all columns or select only the desired columns. NinjaNote: We highly recommend that you do NOT use the "All Columns" option. It is better to select the sync'd columns from the list and verify the column names in the export UI. This will prevent unintended breakage if you start updating stream definitions of the source data.
- Surrogate Key - Check the box to add a "hash_key" column to the export with a calculated surrogate key. When enabled, if any duplicate keys are found, the export will fail. Changes to the export will require a full refresh.
- Filter Data
- Accounts - Select to export the data for all advertisers/accounts or select a single or combination of desired advertiser(s)/account(s)
- Date Range - Select to not restrict the amount of data based on date or select to restrict the amount of data in the export based on a date range and a reference point to frame the date range using these two fields:
- Export - Select a time window consisting of a matter of days, weeks, months, or "Since Last Export"
- of data based on - Day, Metric Date, Executed At, Created At, Updated At, Expired At - NinjaNote: For a conventional, incremental export we suggest the "Export" field be set to "Since Last Export" and the "of data based on" field being set to "Executed at". This constitutes a sync statement of "Export the amount collected SINCE LAST EXPORT of data based on the date the last export was EXECUTED AT.
- Sync Mode
- Use the drop-down to select between:
- Upsert Mode - Exported rows are updated or inserted in the destination based on the surrogate key
- Replace Mode - All rows for the selected date range are first deleted from the destination and then exported rows are inserted - NinjaNote: Select "Upsert Mode" for an incremental export. Select "Replace Mode" if you export data from a provider that restates data for older entries, adding more detailed data for already exported rows.
- Use the drop-down to select between:
- Fill in the fields on the "Destination" tab to designate the desired GCP bucket to receive the export and BigQuery details
- Choose Credentials
- Credentials - Select the credentials for the desired export destination from the drop-down menu
- Configure Destination
- GCP Bucket Name
- GCP Bucket Path (optional)
- Filename Prefix (optional)
- BigQuery Dataset Name - DB should exist in the same region and project as the security token
- BigQuery Table Name - Table will be created on initial export. Configuration changes may require a delete and full refresh.
- Enable gzip compression
- Export Schedule
- Recurrence cron
- Timezone
- Click the "Save" button in the bottom right

Azure Blob Storage
Data Cloud Ship can be configured to send CSV files of your datasets to an Azure Blob Storage container. After creating Azure credentials, adding the credentials to the credential record, and accessing Data Cloud Ship
- Click on the button labeled "New Data Export" in the top right
- Click on "Azure Blob Storage" then the "Select and Continue" button in the bottom right
- Fill in the fields on the "Data" tab to customize the details of the data export
-
Choose Data
- Dataset - Select the desired dataset from the drop-down menu, and then optionally a view
- Columns - Select to export all columns or select only the desired columns. If you select columns manually, you can override the Header row values in that interface.
- Surrogate Key - Check the box to add a "hashkey" column to the export with a calculated surrogate key. When enabled, if any duplicate keys are found, the export will fail. Changes to the export's surrogate key definition will invalidate any previous values you may have stored in your system and will require a full refresh.
-
Filter Data
- Accounts - Select to export the data for all advertisers/accounts or select a single or combination of desired advertiser(s)/account(s)
- Date Range - Select to not restrict the amount of data based on date or select to restrict the amount of data in the export based on a date range and a reference point to frame the date range using these two fields:
-
Export - Select a time window consisting of a matter of days, weeks, months, or "Since Last Export"
-
of data based on - Day, Metric Date, Executed At, Created At, Updated At, Expired At - NinjaNote: For a conventional, incremental export we suggest the "Export" field be set to "Since Last Export" and the "of data based on" field being set to "Executed at". This constitutes a
sync statement of "Export the amount collected SINCE LAST EXPORT of data based on the date the last export was EXECUTED AT.
-
- Fill in the fields on the "Destination" tab to designate the desired Azure Blob Storage container to receive the export
-
Choose Credentials
- Credentials - Select the credentials you created previously for the desired export destination from the drop-down menu
-
Configure Destination
- Storage Account Name
- Container Name
- Path (optional)
- Filename Override Pattern (optional) - Specify the name of the output files. You may use the following tokens:
- {RUN_DATE:date_format} - Datetime report run
- {DATASET_ID} - The dataset's unique ID
- {EXPORT_ID} - The id of this export config
- {REPORT_START:date_format} - First day of date filter, only if a date is applied
- {REPORT_END:date_format} - Last day of date filter, if a date range is applied
- Date_format tokens: YY,YYYY = Year; M, MM, MMM = Month; d, dd = Day of month; HH = Hour (1-24); mm = Minute; ss = Seconds
- For example, "Ads_{REPORTSTART:YYMMdd}" would result in a filename like "Ads_251101.csv.gz"
- Enable gzip compression - drops files in a .gz format.
- Force single output file - Enabling single-file output will write all rows to a single output file, and may result in large file sizes and slower exports. No suffix is added to the filename.
-
Export Schedule
- Recurrence cron
- Timezone
5 Click the "Save" button in the bottom right
Error Handling
Duplicate row errors
If your export fails due to an invalid Surrogate Key definition (hash_key field), then the export history info will contain a link to a file containing a subset of rows that were determined to have the same hash value. You should modify the Surrogate Key definition to include all unique dimensions for the row.
Previous export files
In the export history details (click on the small 'info' icon on the export run list), any source CSV files that were delivered to your destination. These are the source data files, and may not reflect the final filename for exports that allow for a filename override (SFTP, Azure).
Failures due to 0 rows
Marking exports as failed if no rows are exported is an option on all exports. Generally, this means that no new data was imported into the system for that export configuration prior to the run. Check the source Dataset's ingestion history and verify that data ingestion completes prior to export run times. If data arrived too late, you can do a One Time run on an export using the default settings with the "Run Now" option on the export action menu.
One Time Exports with Custom Date Ranges
A one-time re-sync triggered export is possible to configure based on existing, already configured exports.
- Navigate to Data Exports
- Select the desired export
- Click on "More Actions" in the top right
- Click on "Re-sync Data
- Near the bottom of the page select "Custom Date Range" from the drop-down next to the "Export" radio button under "Date Rage"
- Fill in the desired start and end date
- Click "Run Once" in the bottom right

Some date range rules in place:
-Start Date can be any time between now (today) and 2 years ago.
-End Date can be any time between now (today) and 2 years ago.
-Start Date must be on or before End Date
-End Date must be on or after Start Date
Bulk Re-Run Exports with Batched Run
Need to re-run an export across multiple days or months at once? The Batched Run option lets you replay an export as if it were scheduled to run on each day (or month) within a date range you define — no more clicking through each day individually.
Each execution simulates a scheduled run using the export's existing configuration, incrementing automatically from the start date to the end date.
How Batched Run Works
A Batched Run requires two settings: an Interval and a Date Range. Understanding the difference between them is key to using this feature effectively.
Interval — How big is each slice of data?
| Interval | What It Does |
|---|---|
| Previous Day | Each step covers "yesterday" relative to that point in the run sequence. This mirrors how a daily scheduled export would behave. |
| 1 Day | Each step covers exactly one calendar day of data. |
| Previous Month | Each step covers the previous full calendar month relative to that point in the run sequence. |
Date Range — What overall period do you want to cover?
Use the Range Start and Range End date pickers to define the span of time you want the batched run to process.
Putting It Together
The system combines your Interval and Date Range to automatically generate and execute the correct number of individual export runs. For example:
- Interval: 1 Day + Date Range: Jan 1 – Jan 30 → 30 individual export runs, one for each day, kicked off automatically.
- Interval: Previous Month + Date Range: Jan 1 – Mar 31 → Export runs simulating a monthly schedule across that range.
How to Run a Batched Export
- Navigate to Data Exports
- Select the desired export
- Click on "More Actions" in the top right
- Click on "Batched Run"
- Select an Interval from the drop-down (Previous Day, 1 Day, or Previous Month)
- Set the Range Start and Range End dates using the date pickers
- Click "Run" to start the batched export
When to use Batched Run vs. Run Once:
- Use Run Once when you need to re-export a single custom date range as one export execution.
- Use Batched Run when you need to replay an export as if it ran on a schedule across multiple days or months — for example, to backfill daily export files for a date range.
Updated 16 days ago